
This is not really fresh news since this kitchen has been done for a couple of months now, but I still wanted to write about the complete process. So here I am taking you through all the different steps to build an IKEA kitchen. You might have seen some sneak peek in the article I made about sprucing up your kitchen rental. But this time I’m going to show you everything! The good, the bad and the ugly 😉 So let’s get into this! Also, follow me on Instagram if you want to follow my home decor adventure day by day.
Table of Contents
- The Kitchen before
- Phase 1: Designing a kitchen in a rental
- Phase 2: Building a kitchen in a rental
- The kitchen reveal!
- Before / after pictures
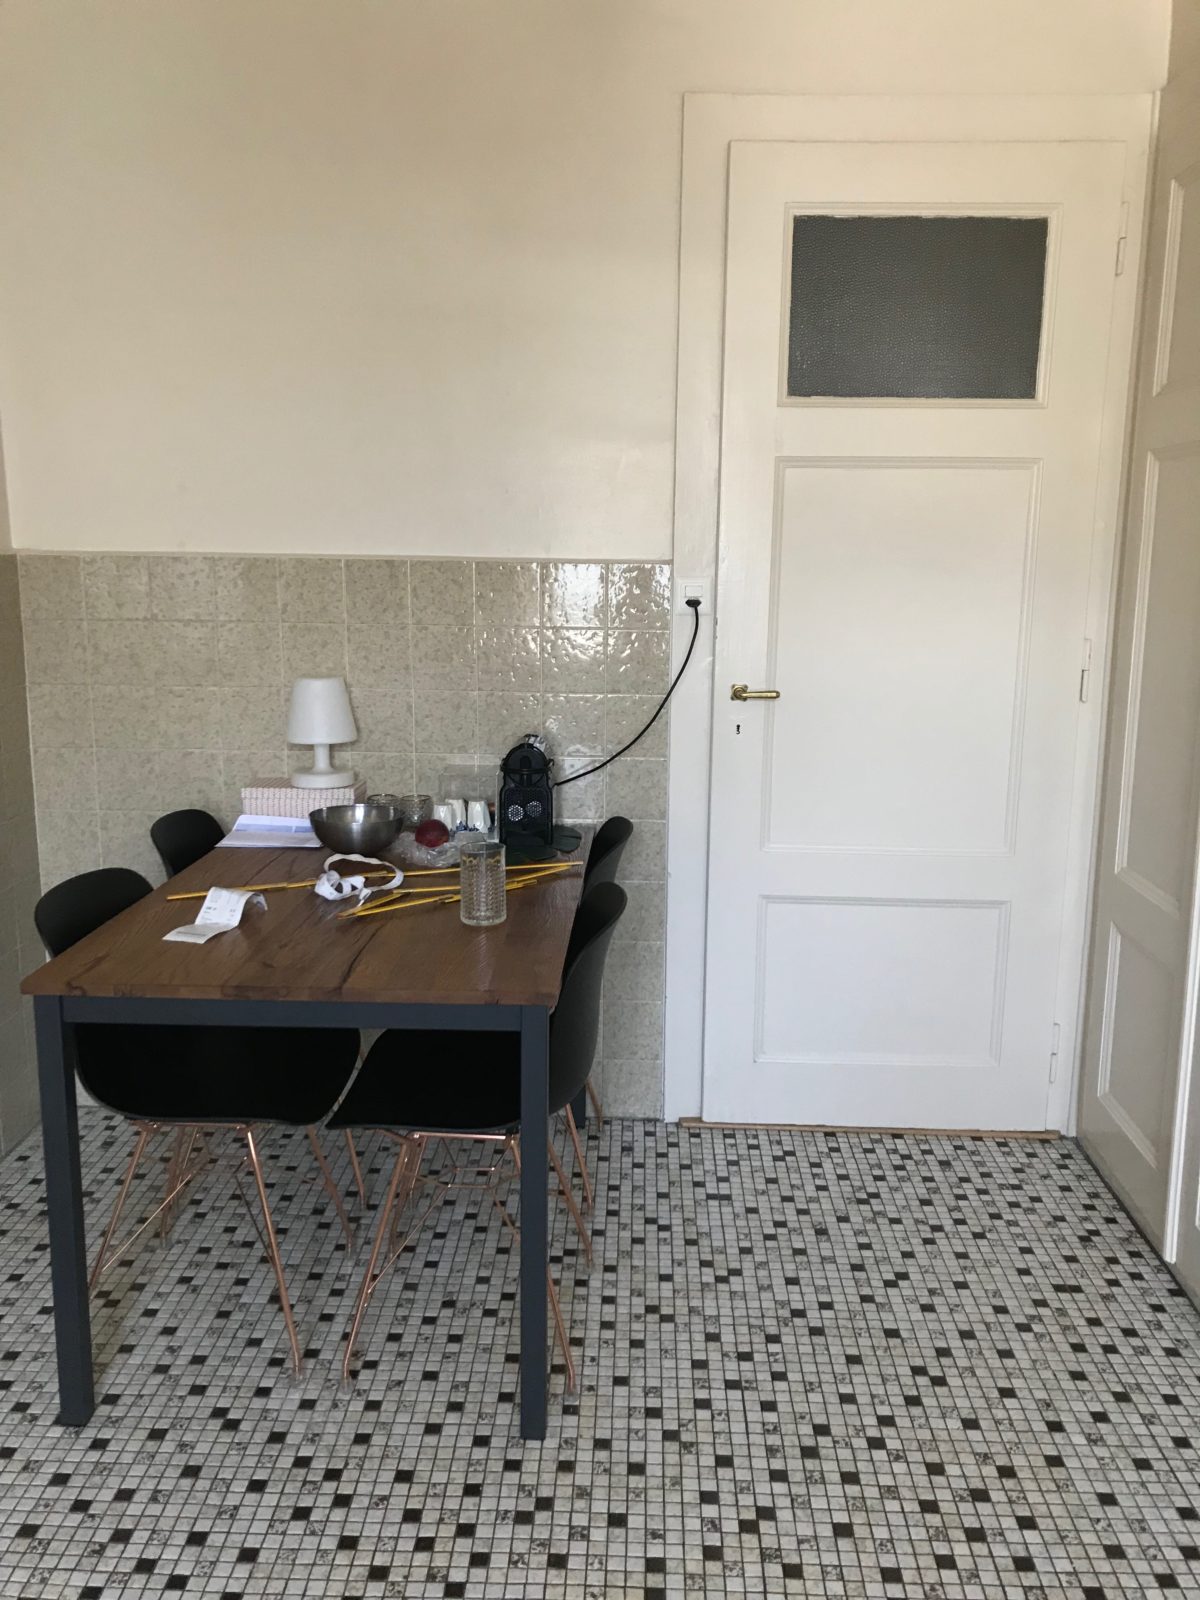
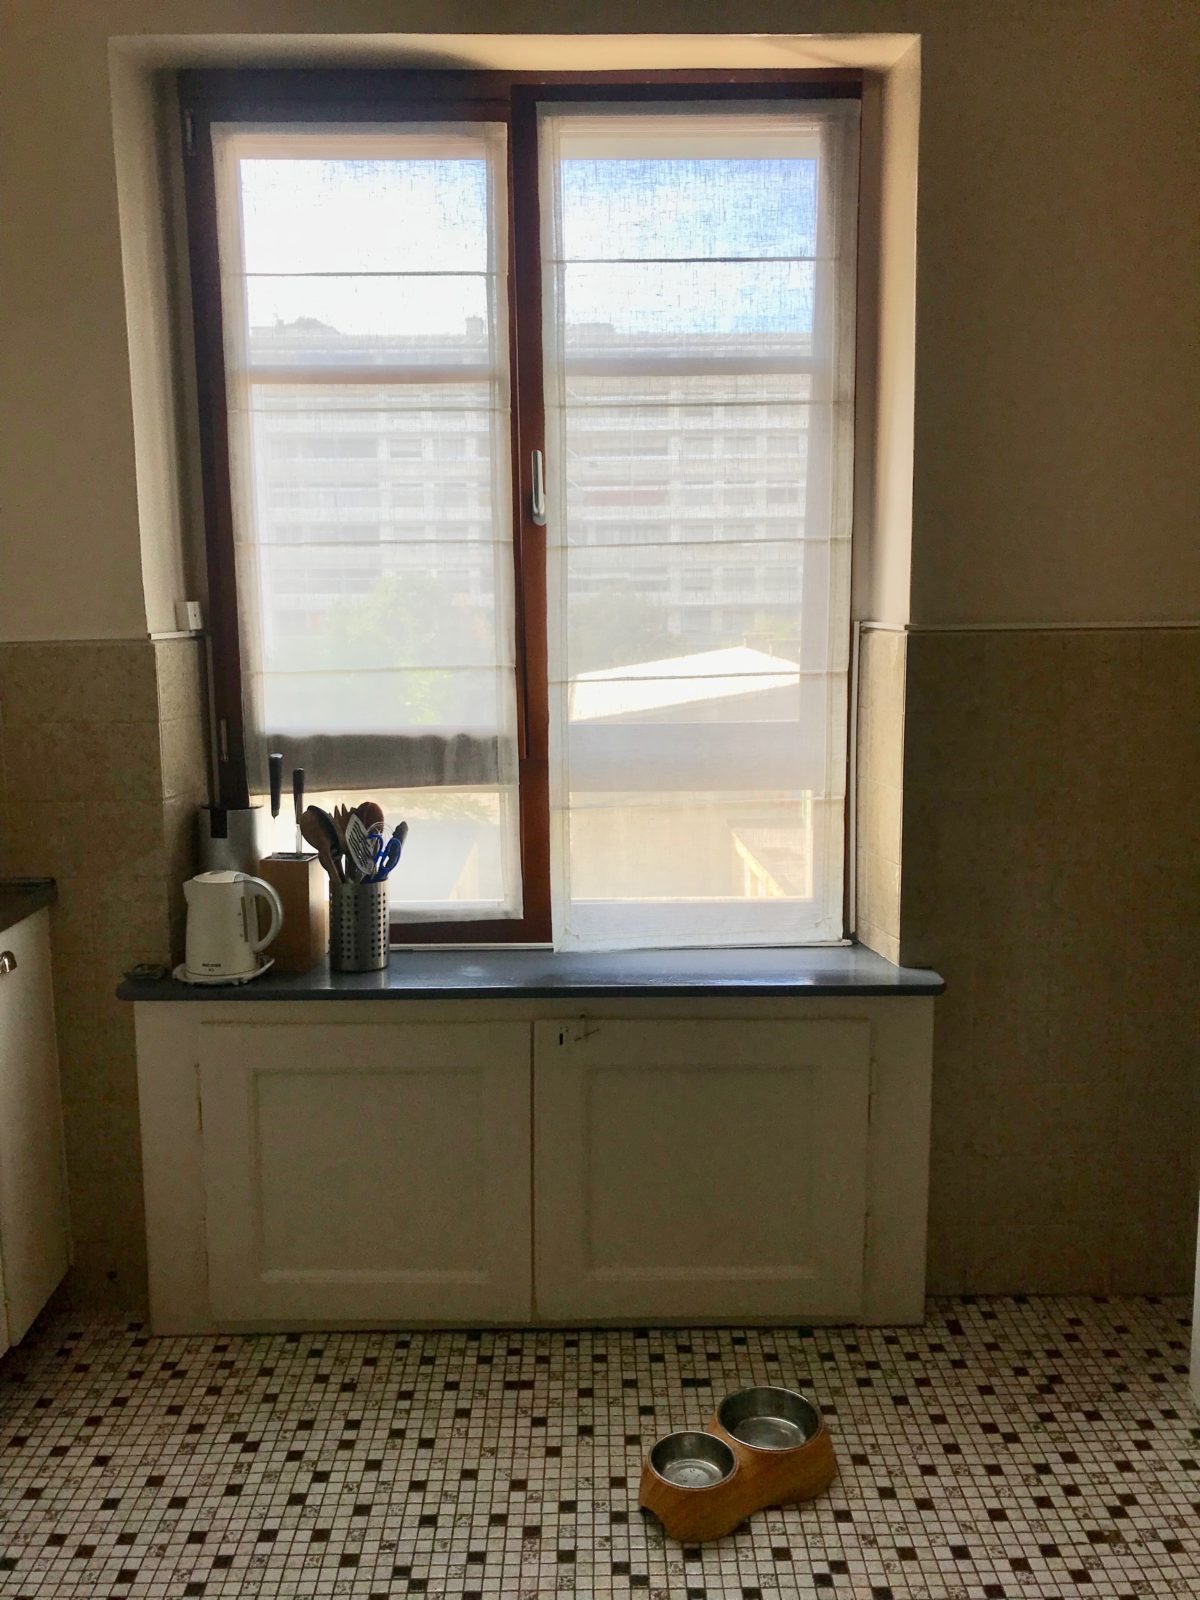
We decided to move from our old rental apartment to this new rental, because it was more spacious and had really bigger room. Our old place was very small just under 40 square meters (20 feet) and very old. It hadn’t been redone in decades and we weren’t really able to do anything about it without risking a rent raise. So when this slightly bigger and newer but still with the stamp of the old, apartment was within our range we just jumped on the opportunity.
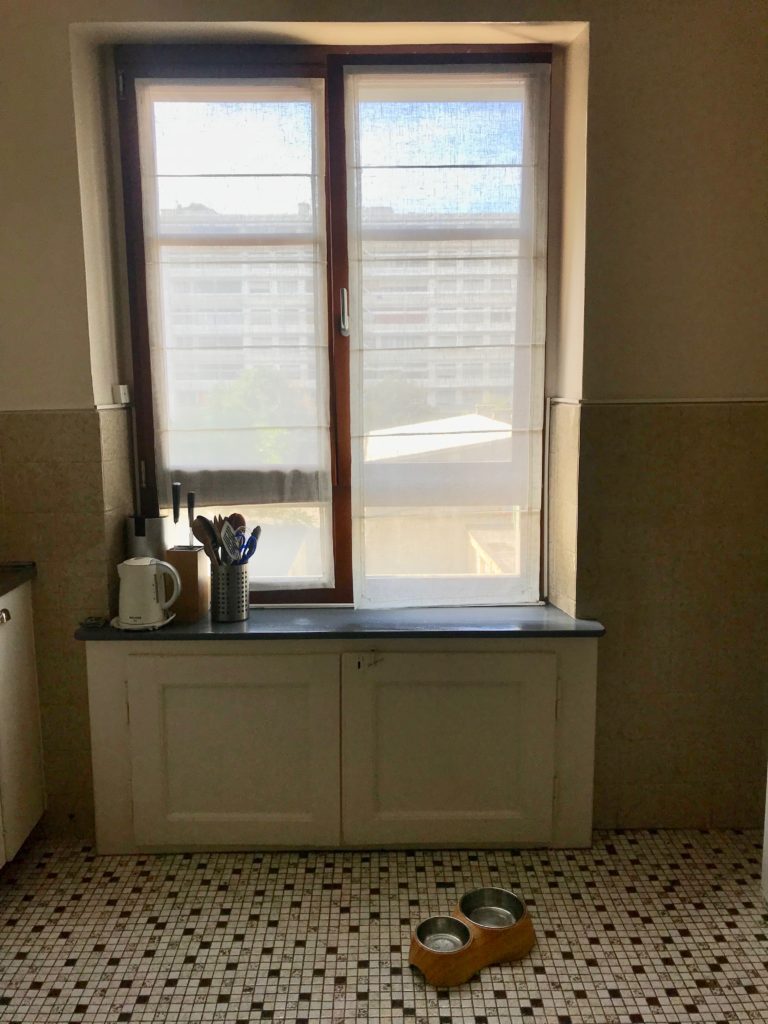
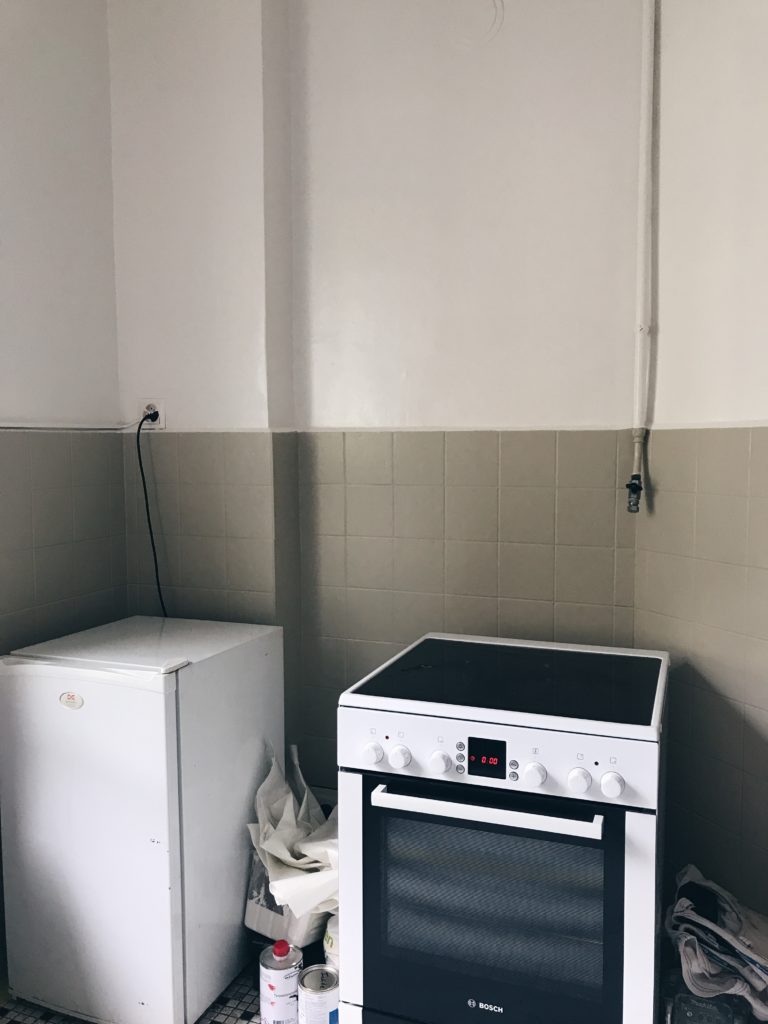
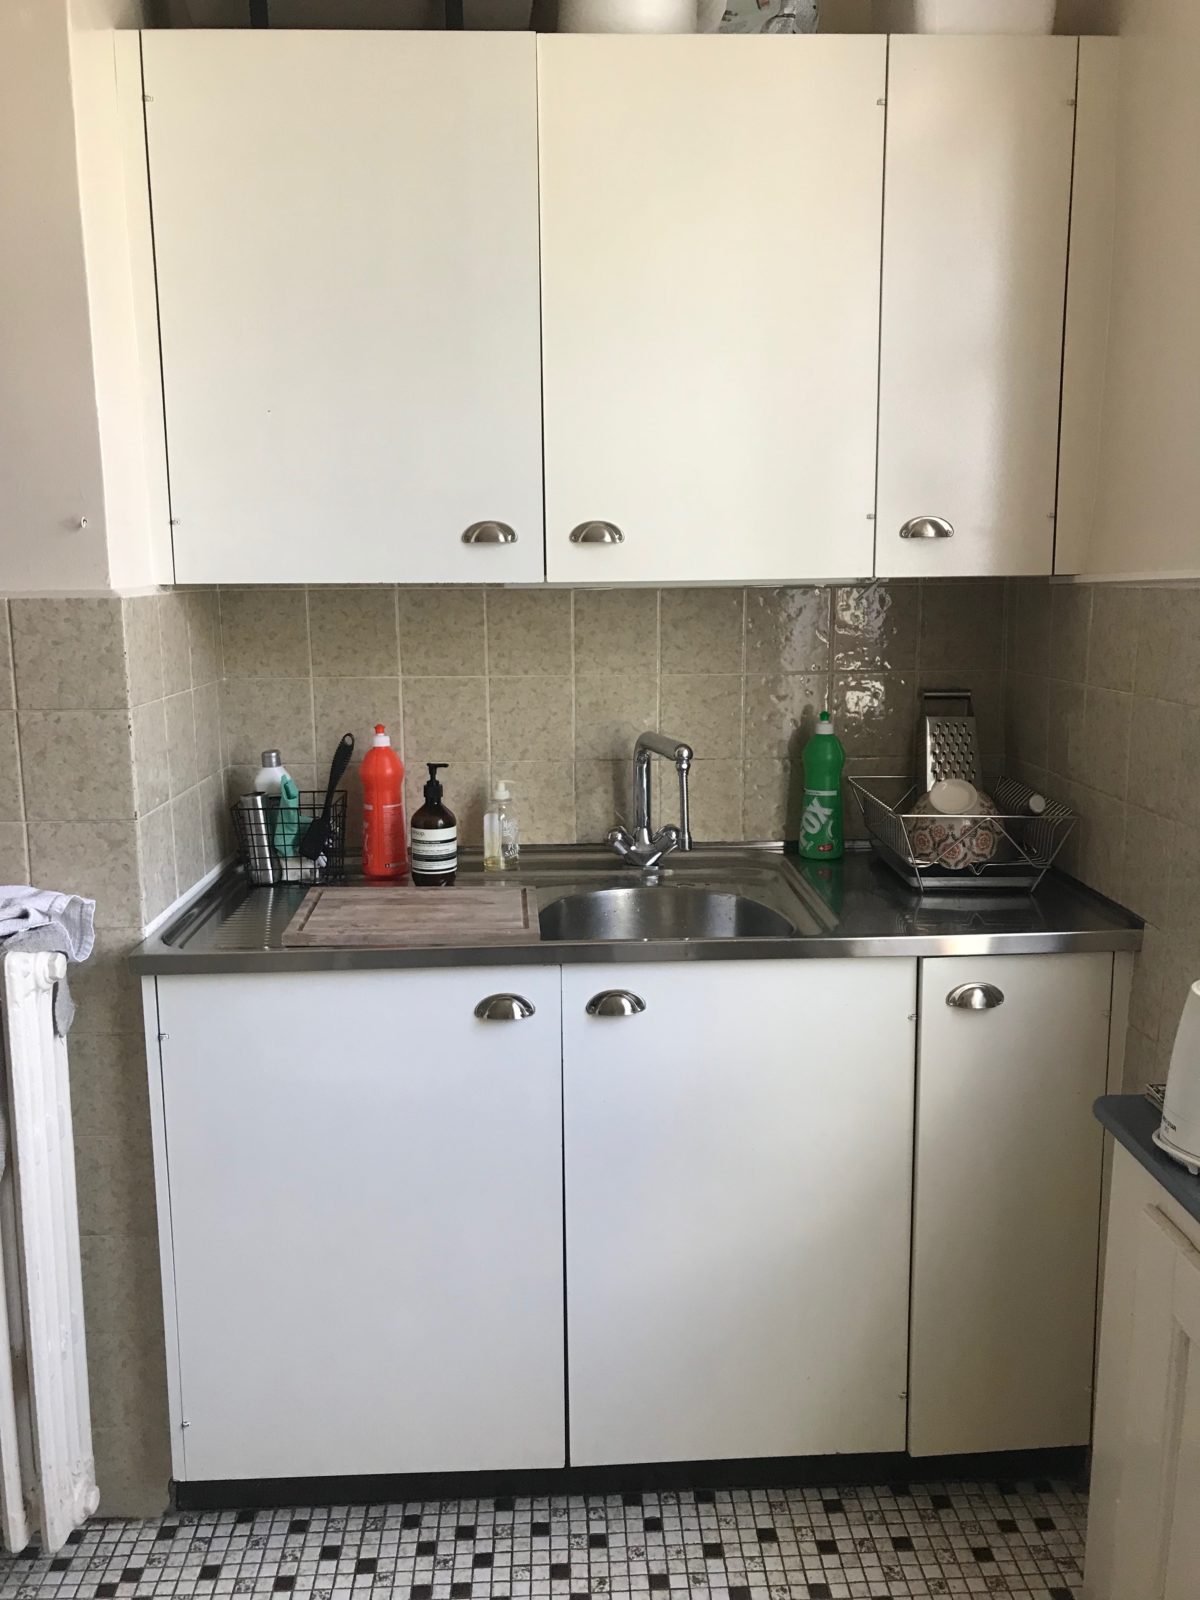
It might seem weird for some of you but when you rent an apartment in Geneva, there is not necessarily an equipped kitchen in it. Our old place had only a sink with two cabinets underneath and the doors were missing… In the new, we were lucky enough to have also cabinets above the sink… But that’s it. No counter space, no fridge, no oven, no nothing.
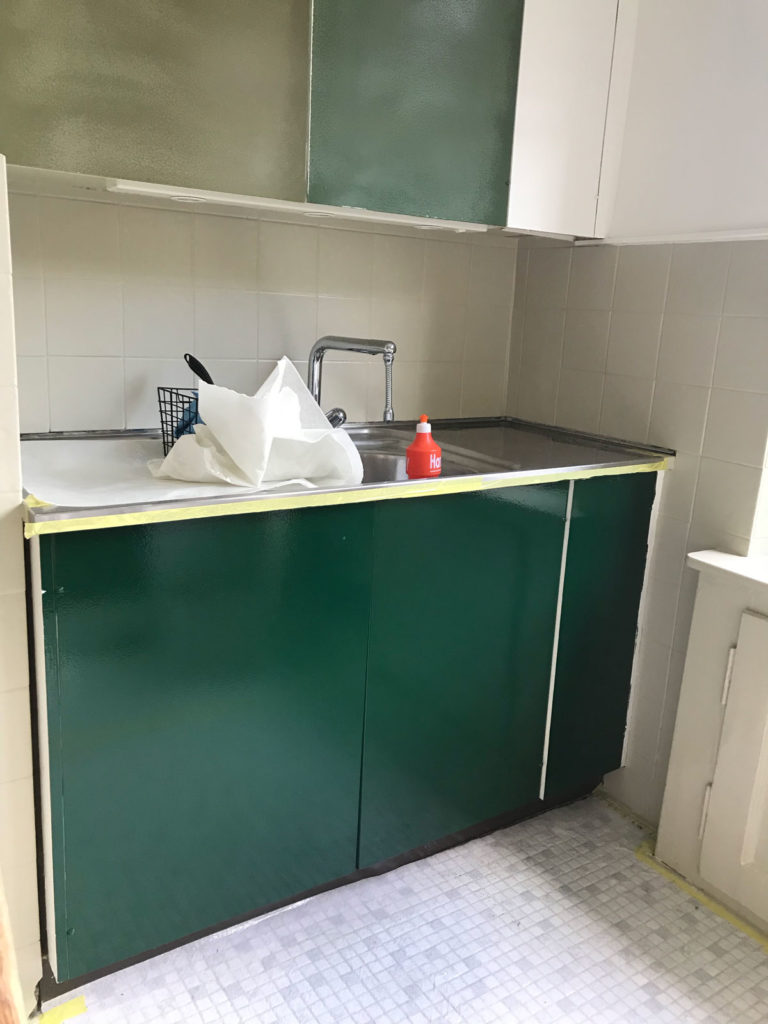
In a sense, I think that I’m happier that there was nothing rather than a mid 90’s kitchen that must remain untouched. We wouldn’t have had the chance to do this amazing green kitchen otherwise.
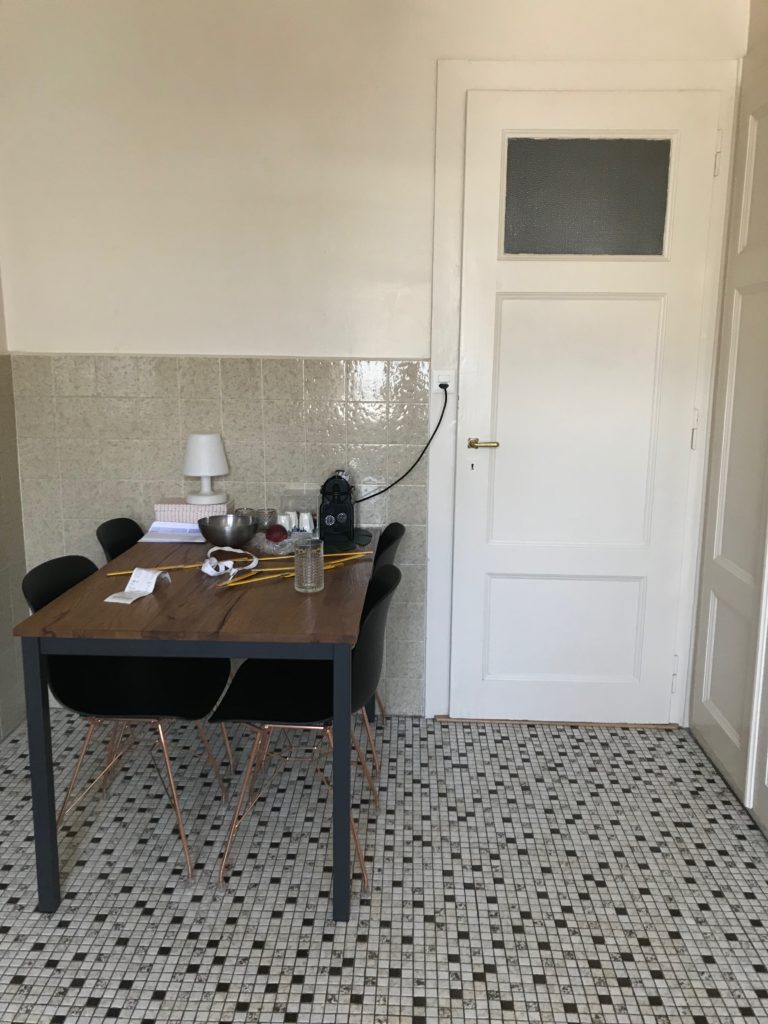
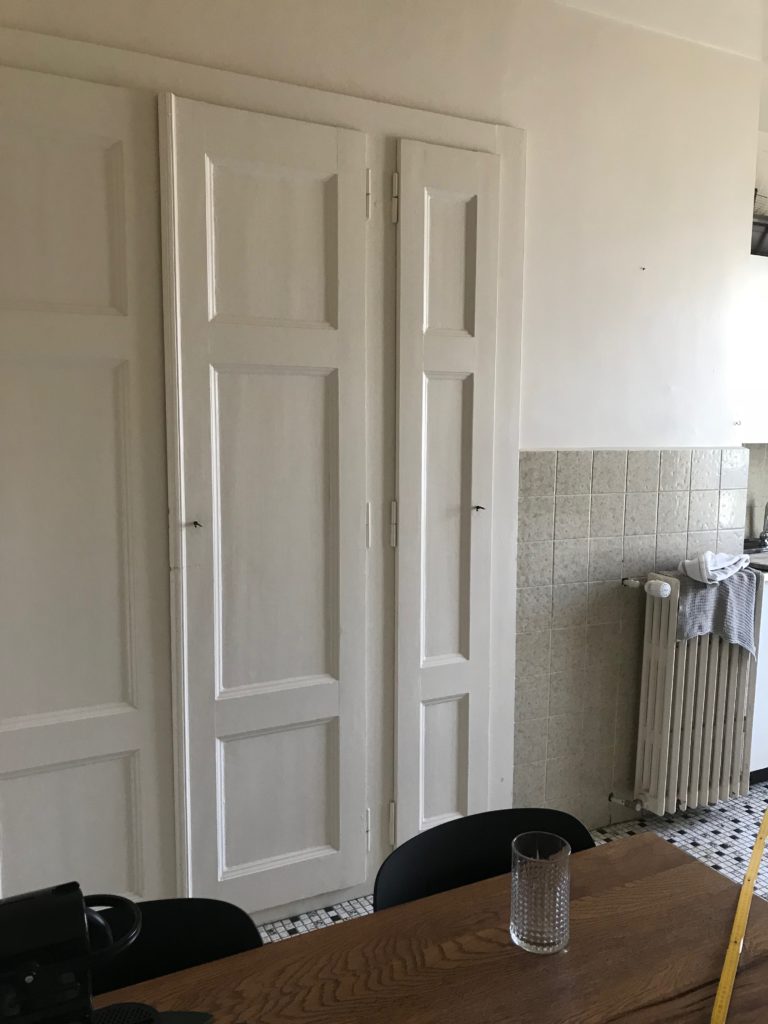
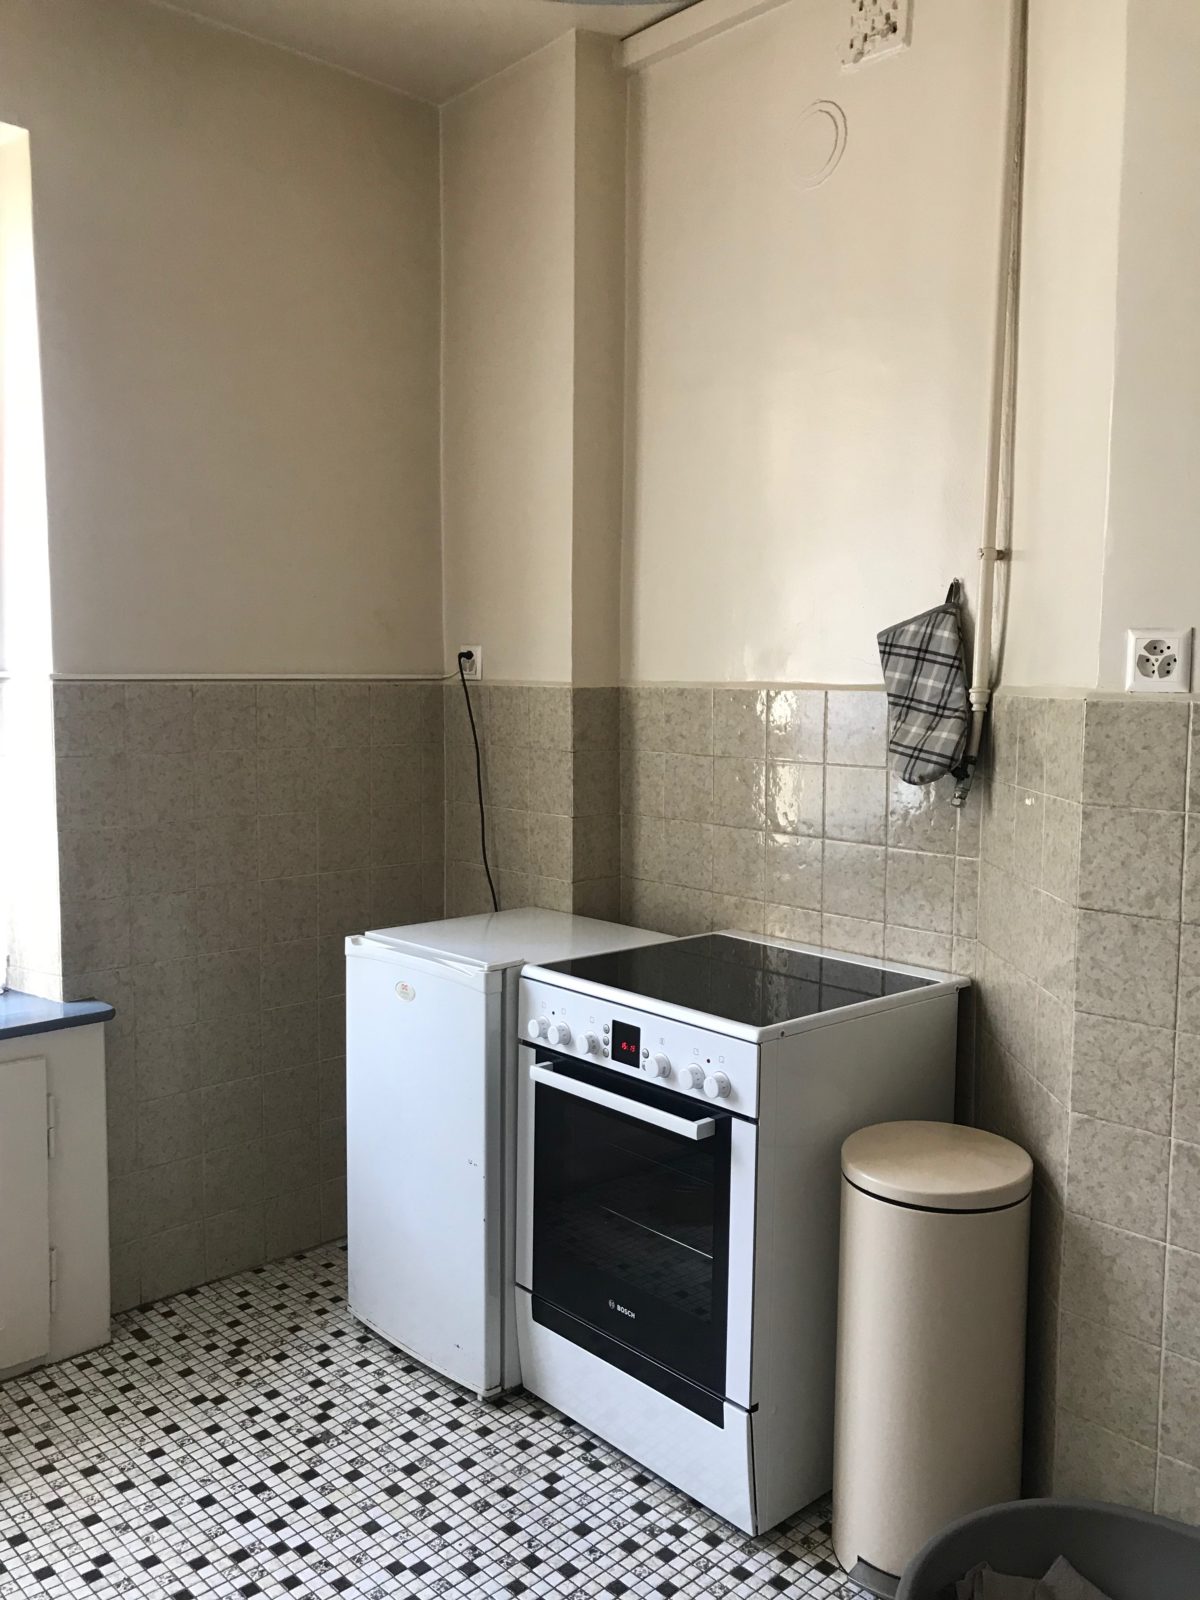
The Kitchen before
So as I just said, the kitchen before was almost non-existent except for a sink compartment with cabinets above and underneath and a very big built-in cupboard. Also a small cupboard for storage that used to be a fridge decades ago. But the room was spacious and we could totally see its potential.


Phase 1: Designing a kitchen in a rental
So as you may imagine, designing a kitchen in a rental has its limitations. You can’t do whatever you want because obviously, you don’t own the place. You need to be able to put things exactly the way they were when you leave. (or at least leave it in better shape than before)
Expectation v.s. reality
Surely I would have loved to change the floor tiles and also open up the wall that separates the hallway from the kitchen with a steel-framed glass. Also changing the sink for some old farm style sink instead of that stainless steel I don’t really adore. I would have also bought a beautiful vintage oven that I would have had built-in within the new kitchen. Well, this is what I would have done if the place was mine but really who wants to invest tens of thousands into a rental? So I had to lower my expectations and be more realistic.
Finding the starting point
At first, what was the hardest was to find the starting point. It may seem stupid, but it’s not always easy to know where to start. So I decided to start with the constraints.
I knew that some things were non-negotiable. For instance, I couldn’t get rid of the already existing cabinets and sink. I needed to add a dining room into this kitchen because there was no other space where to do it. Finally, I needed more space to conceal my stuff and also counter space to cook.
List your needs and wants
It’s always easier to make a list so you can keep a clear head about this and not lose sight of crucial points. Here is mine:
- More space to store our kitchenware and food
- Include the dining area in the kitchen
- Some counter space to cook
- Include our stovetop in the kitchen plan
- Integrate our chairs
From there I considered the aesthetic side. The floor tile was okay, I wouldn’t have chosen that but I didn’t hate it. However, the tiling on the wall was really hard to play with. The color was really not working for me. So I knew I had to paint the walls but could leave the floor untouched.
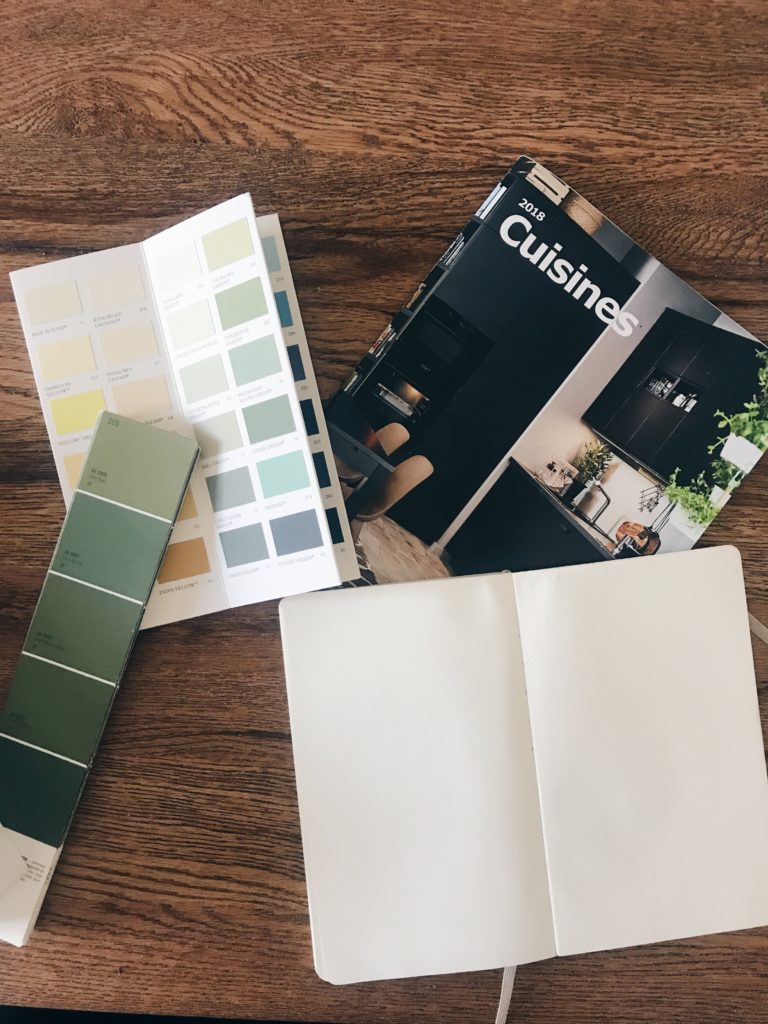
Inspiration
After that, I already had a good idea of the type of kitchen I wanted but I needed to do more researches. I made a Pinterest board to help me define it more precisely. This phase taught me that I was really attracted by green painted cabinets and that I wanted something that looked sleek but cozy.
If I had to define it in terms of interior design styles, I would say mainly modern with some industrial hues and farmhouse touches
Color scheme
Once I had a clearer idea of the type of kitchen I wanted, I needed to define my color scheme. For that, I used a very efficient app named Pantone studio. I used it to pick the colors of my palette and see if they were functioning well together. What’s great about this app is that if you like the tones of a picture, you can extract its color palette.
If you want to go deeper into how to build a full color palette for any room, not just a kitchen, I have a step-by-step method here.
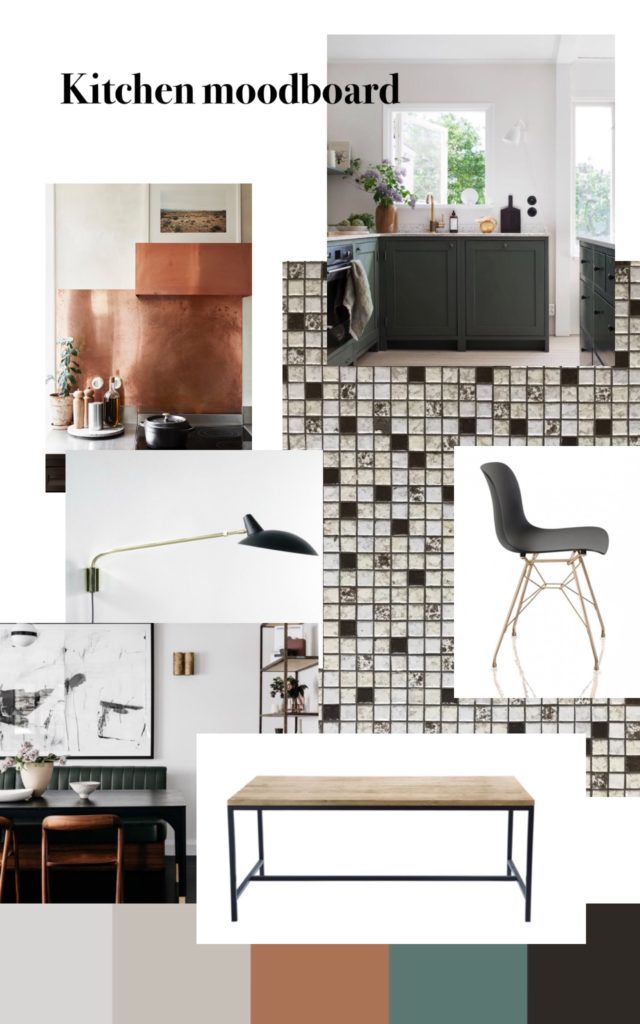
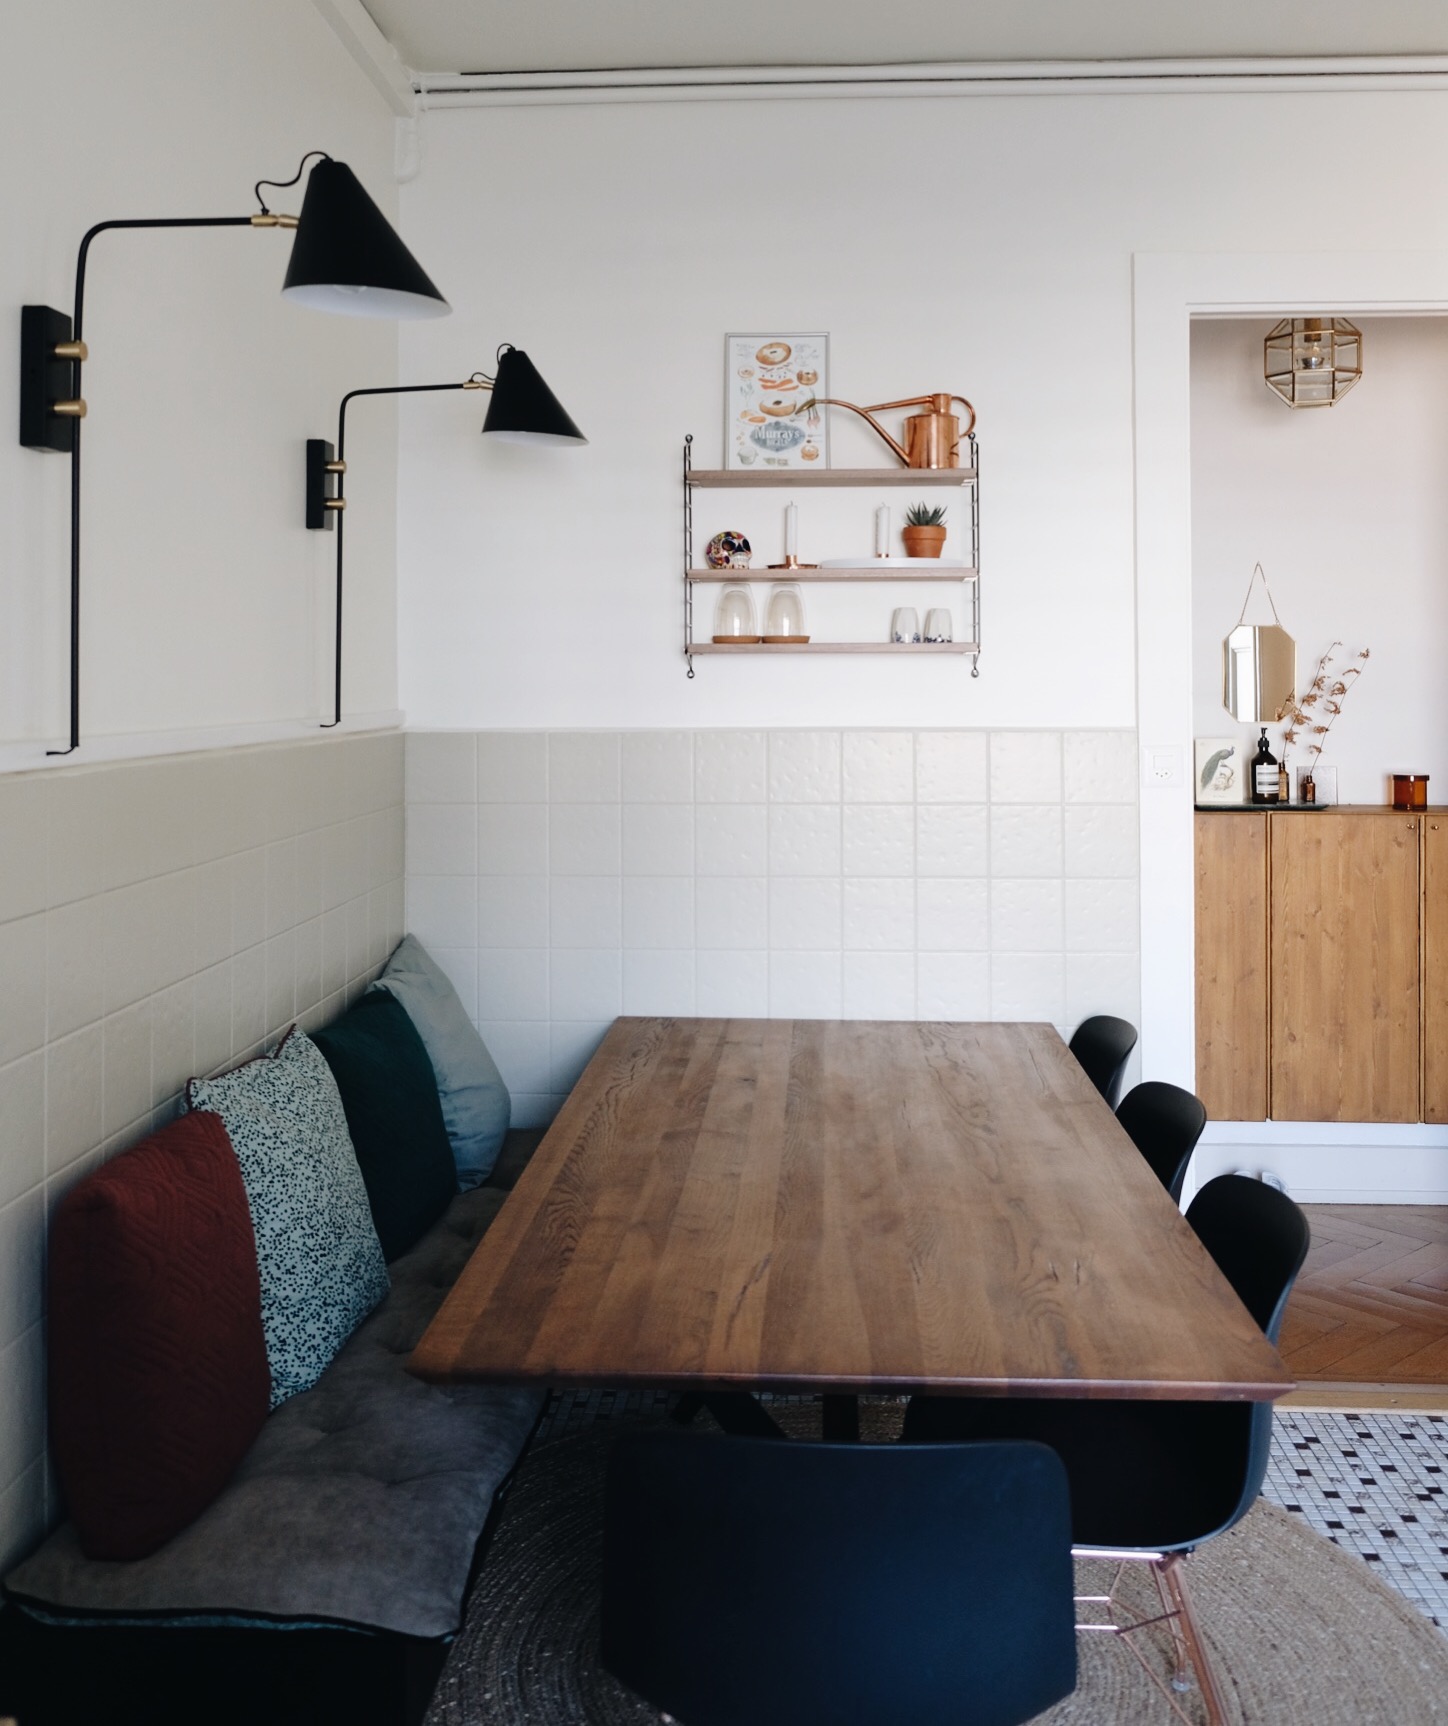
Making a Moodboard
At this point, I just needed to see if all these elements were working together. So I made a moodboard with the colors from the app plus a picture of the kitchen tile, and the chairs I wanted to keep. This step gave me a good idea of what the final result could look like.
*keep in mind that this moodboard was done in the very early stages. Some things have evolved since then but basically, it helped me a lot in keeping a line.
Planning your Ikea kitchen
After all these steps, you either can go online and start to draw you Ikea kitchen on your own, make an appointment at Ikea, or make them come to your home. I chose to go online because I wanted to play around a bit before planning it with someone. As the tool is not always easy to use especially if you have a crooked room (like us) I would probably recommend you opt for the Kitchen planning at home. I think it’ll be easier for the expert to give you advice in the actual room. And even though it has a price, it’s a good investment.

*This plan is missing the already existing cabinets and sink plus the C wall C is a little skewed and not straight at all. Same for the wall behind the future kitchen, it misses an angle. It was not possible to draw it with Ikea kitchen planning tool.
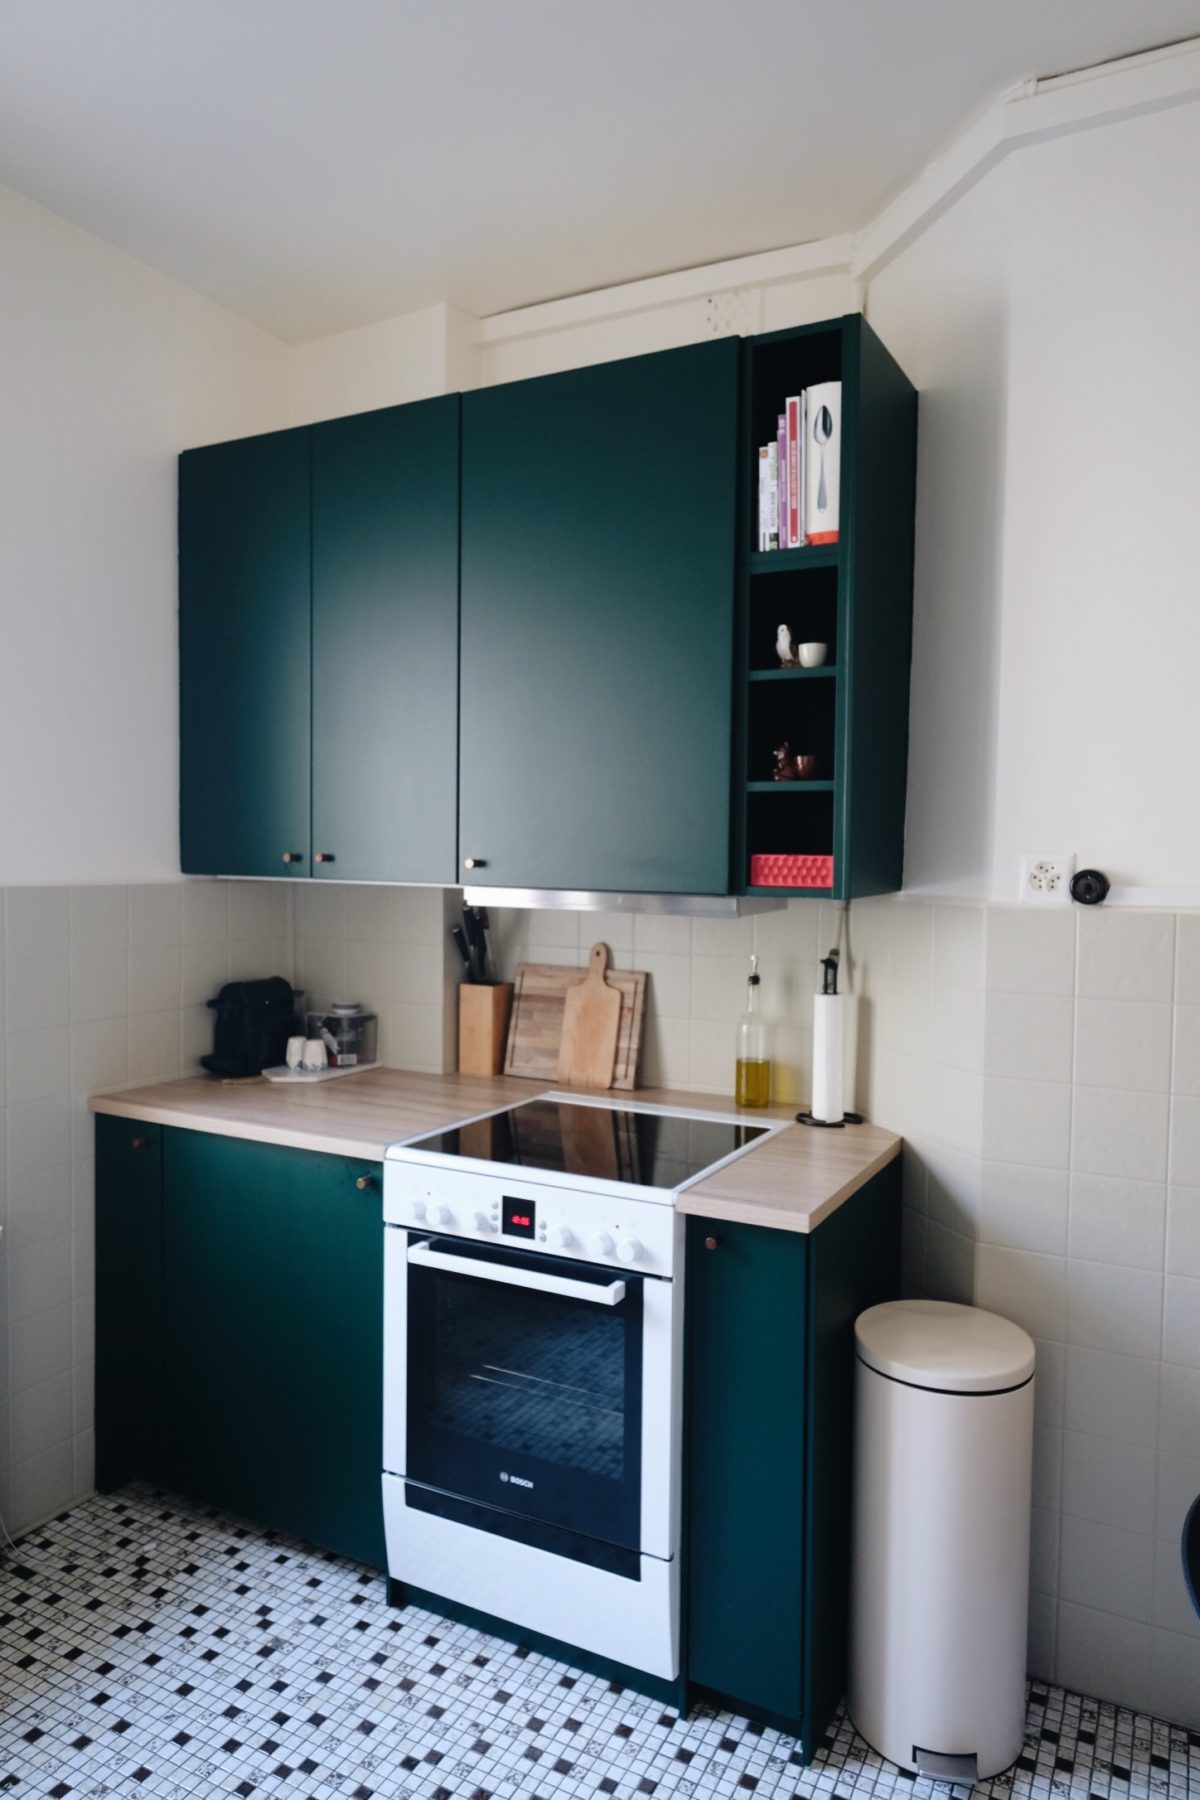
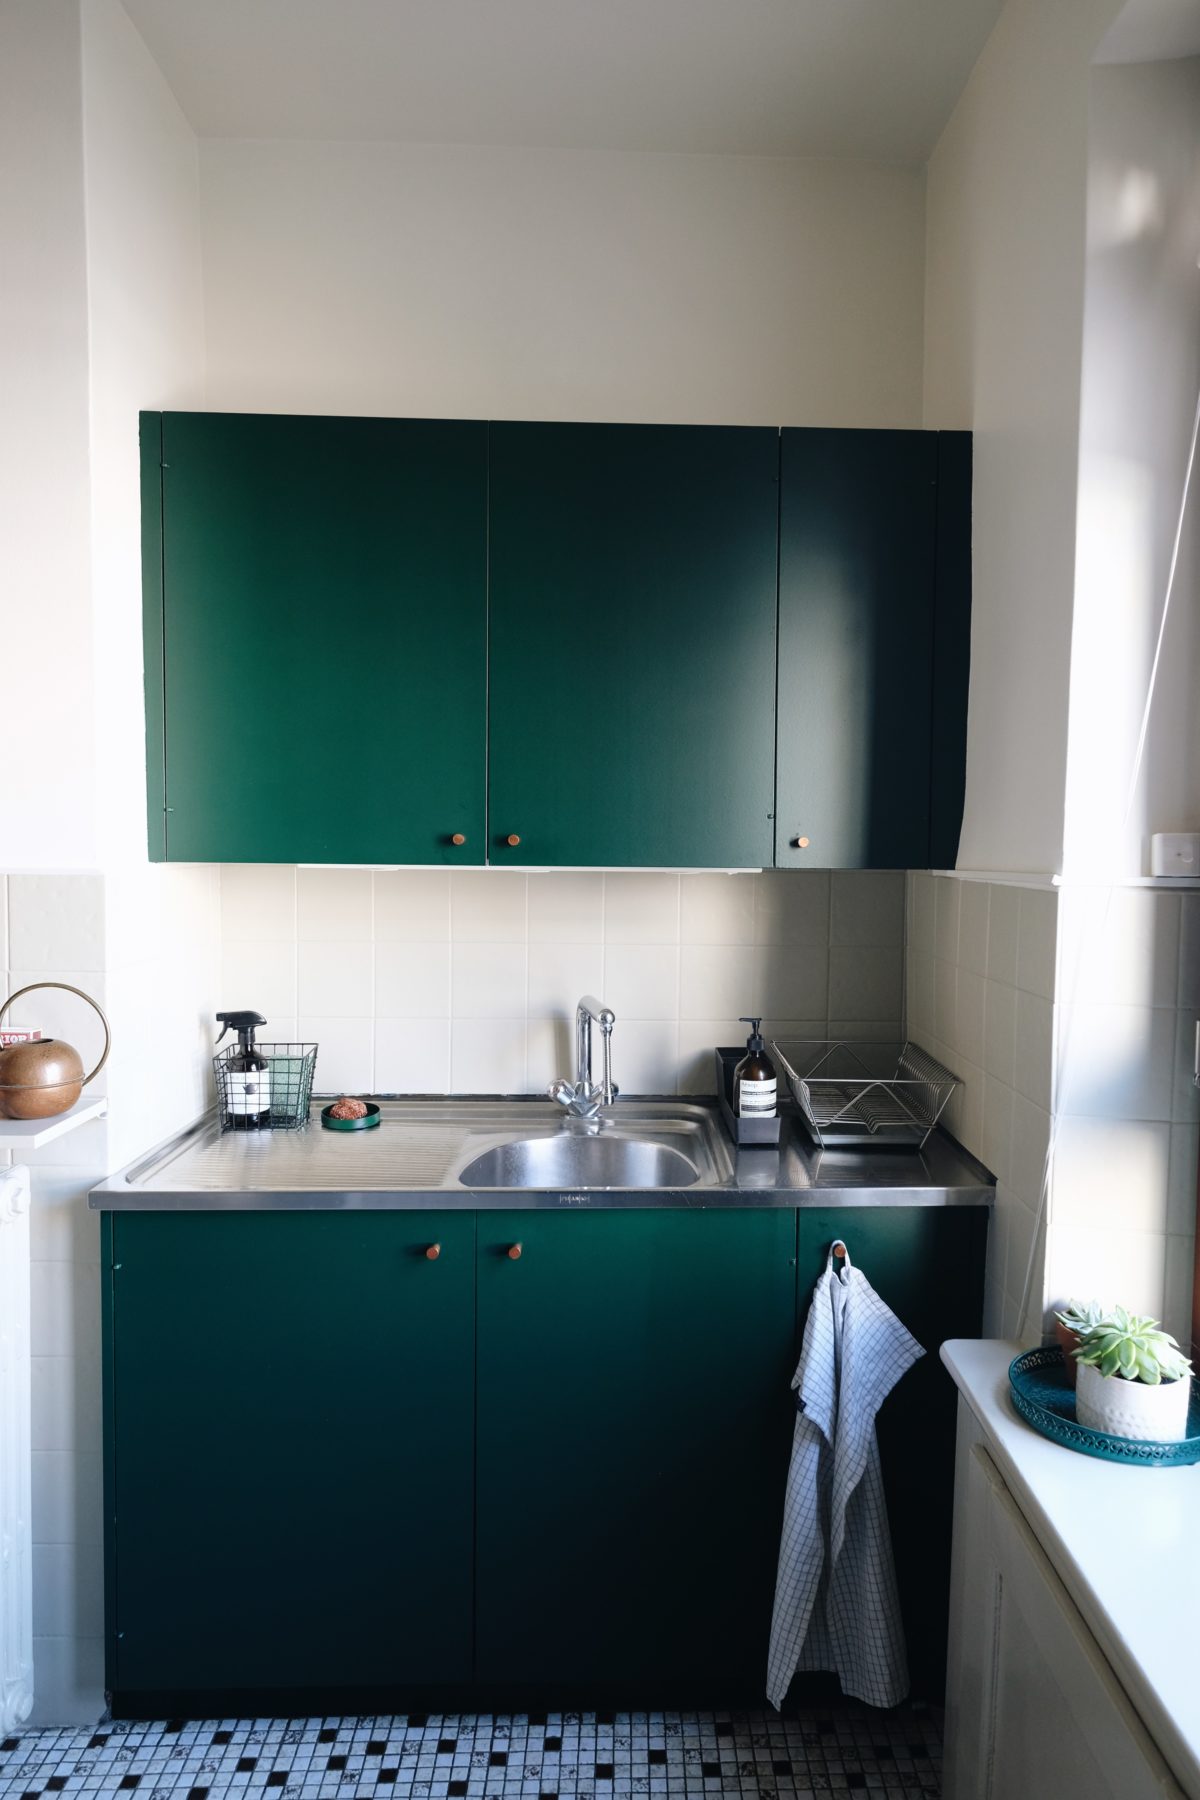
For our Ikea cabinets, I chose to go with the Veddinge front, for its sleekness and the fact that it was also matching the already existent cabinets. I checked with Ikea if it was okay to paint these doors with a little prepping, of course.
For the countertops, I originally wanted to go with a stone countertop but the price stopped me right there. As I said, we are in a rental so the point here was also to stay reasonable with the costs. So I chose the Ekbacken worktop light oak effect laminate. It was not what I would have chosen if it was for my home but this light oak effect really did the trick. Plus it was easy to care for and the wooden texture was really great with the green shade I had in mind.
So once I had taken my measurements* and play around with Ikea kitchen planner tool, I took an appointment with an expert at Ikea. We discussed my design and upgraded some things, their advice is always good to take. Then, I had Ikea’s measurements service come to my home to verify my measurements and then back at Ikea to adjust and finalized the order.
*Ikea offers (for 200 CHF) measurement services that you can use to confirm or correct your measurements. This way, before you buy your kitchen, you can be certain that it will fit.
Phase 2: Building a kitchen in a rental
I decided to not go with Ikea’s building service as I was recommended a good contractor to work with. From this point, I was done and had to let our contractor do his job.
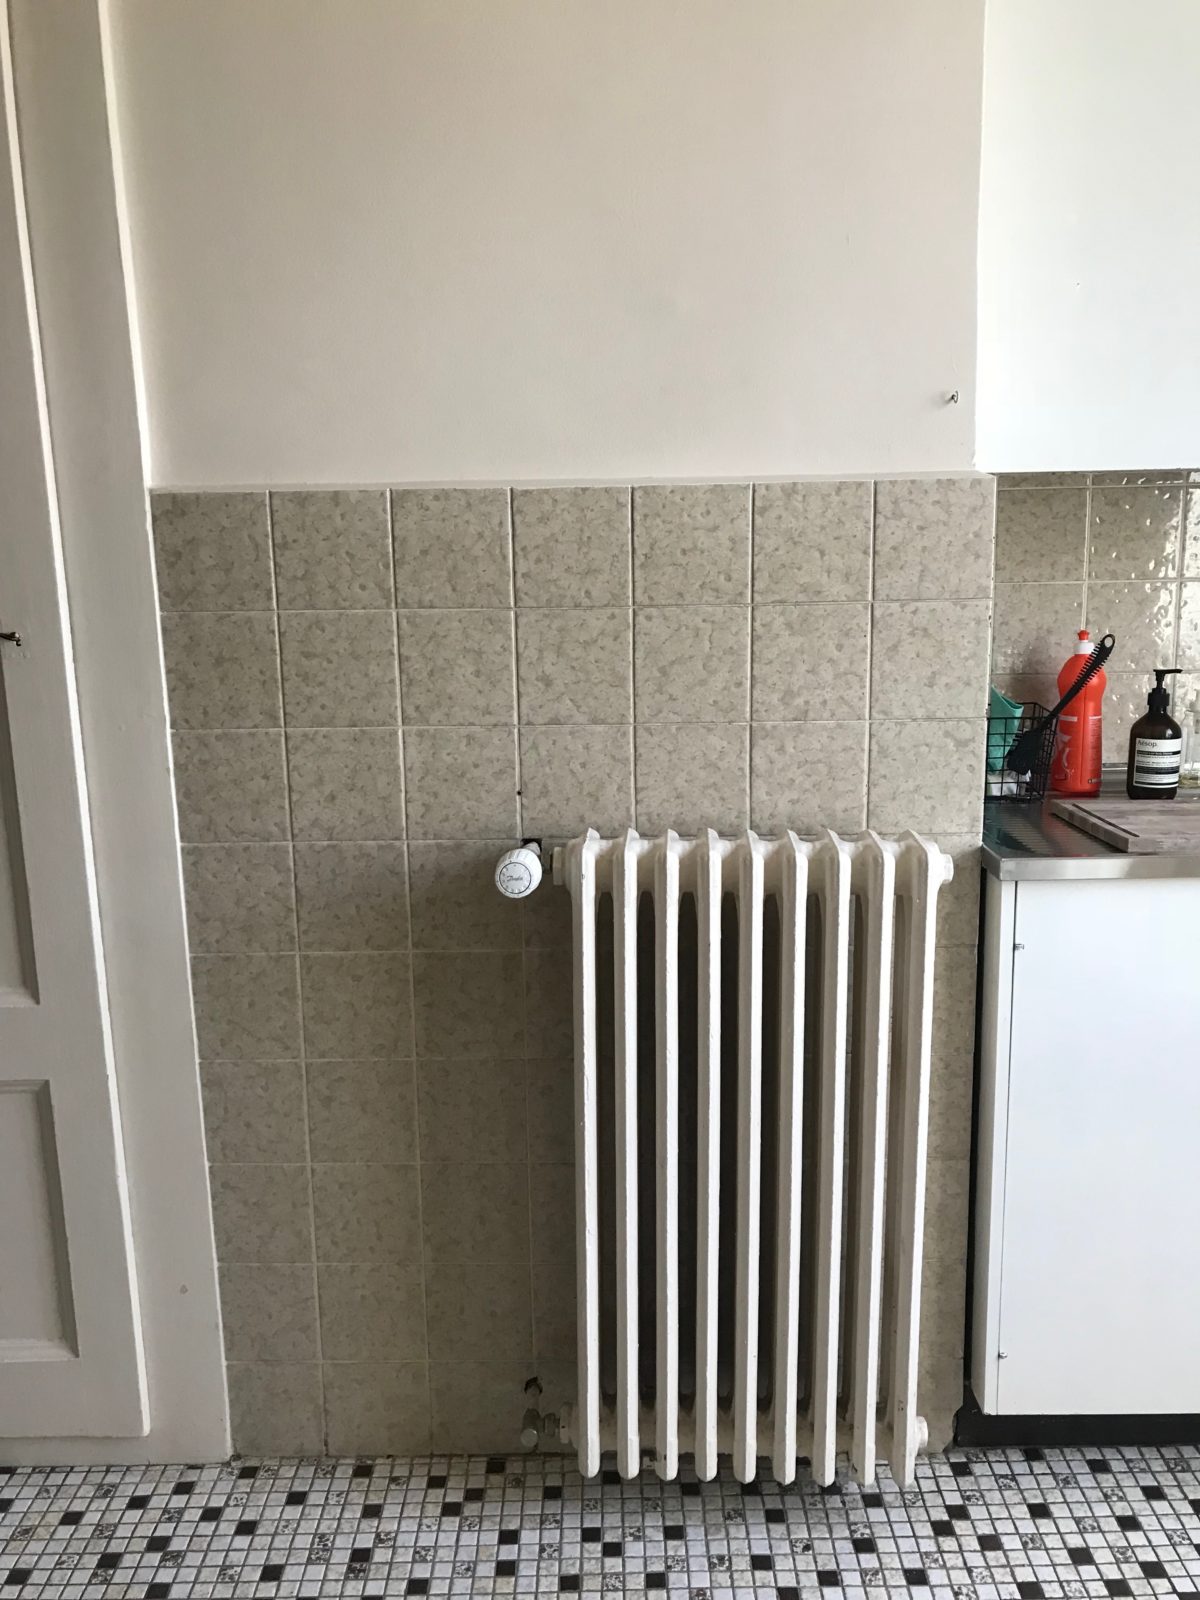
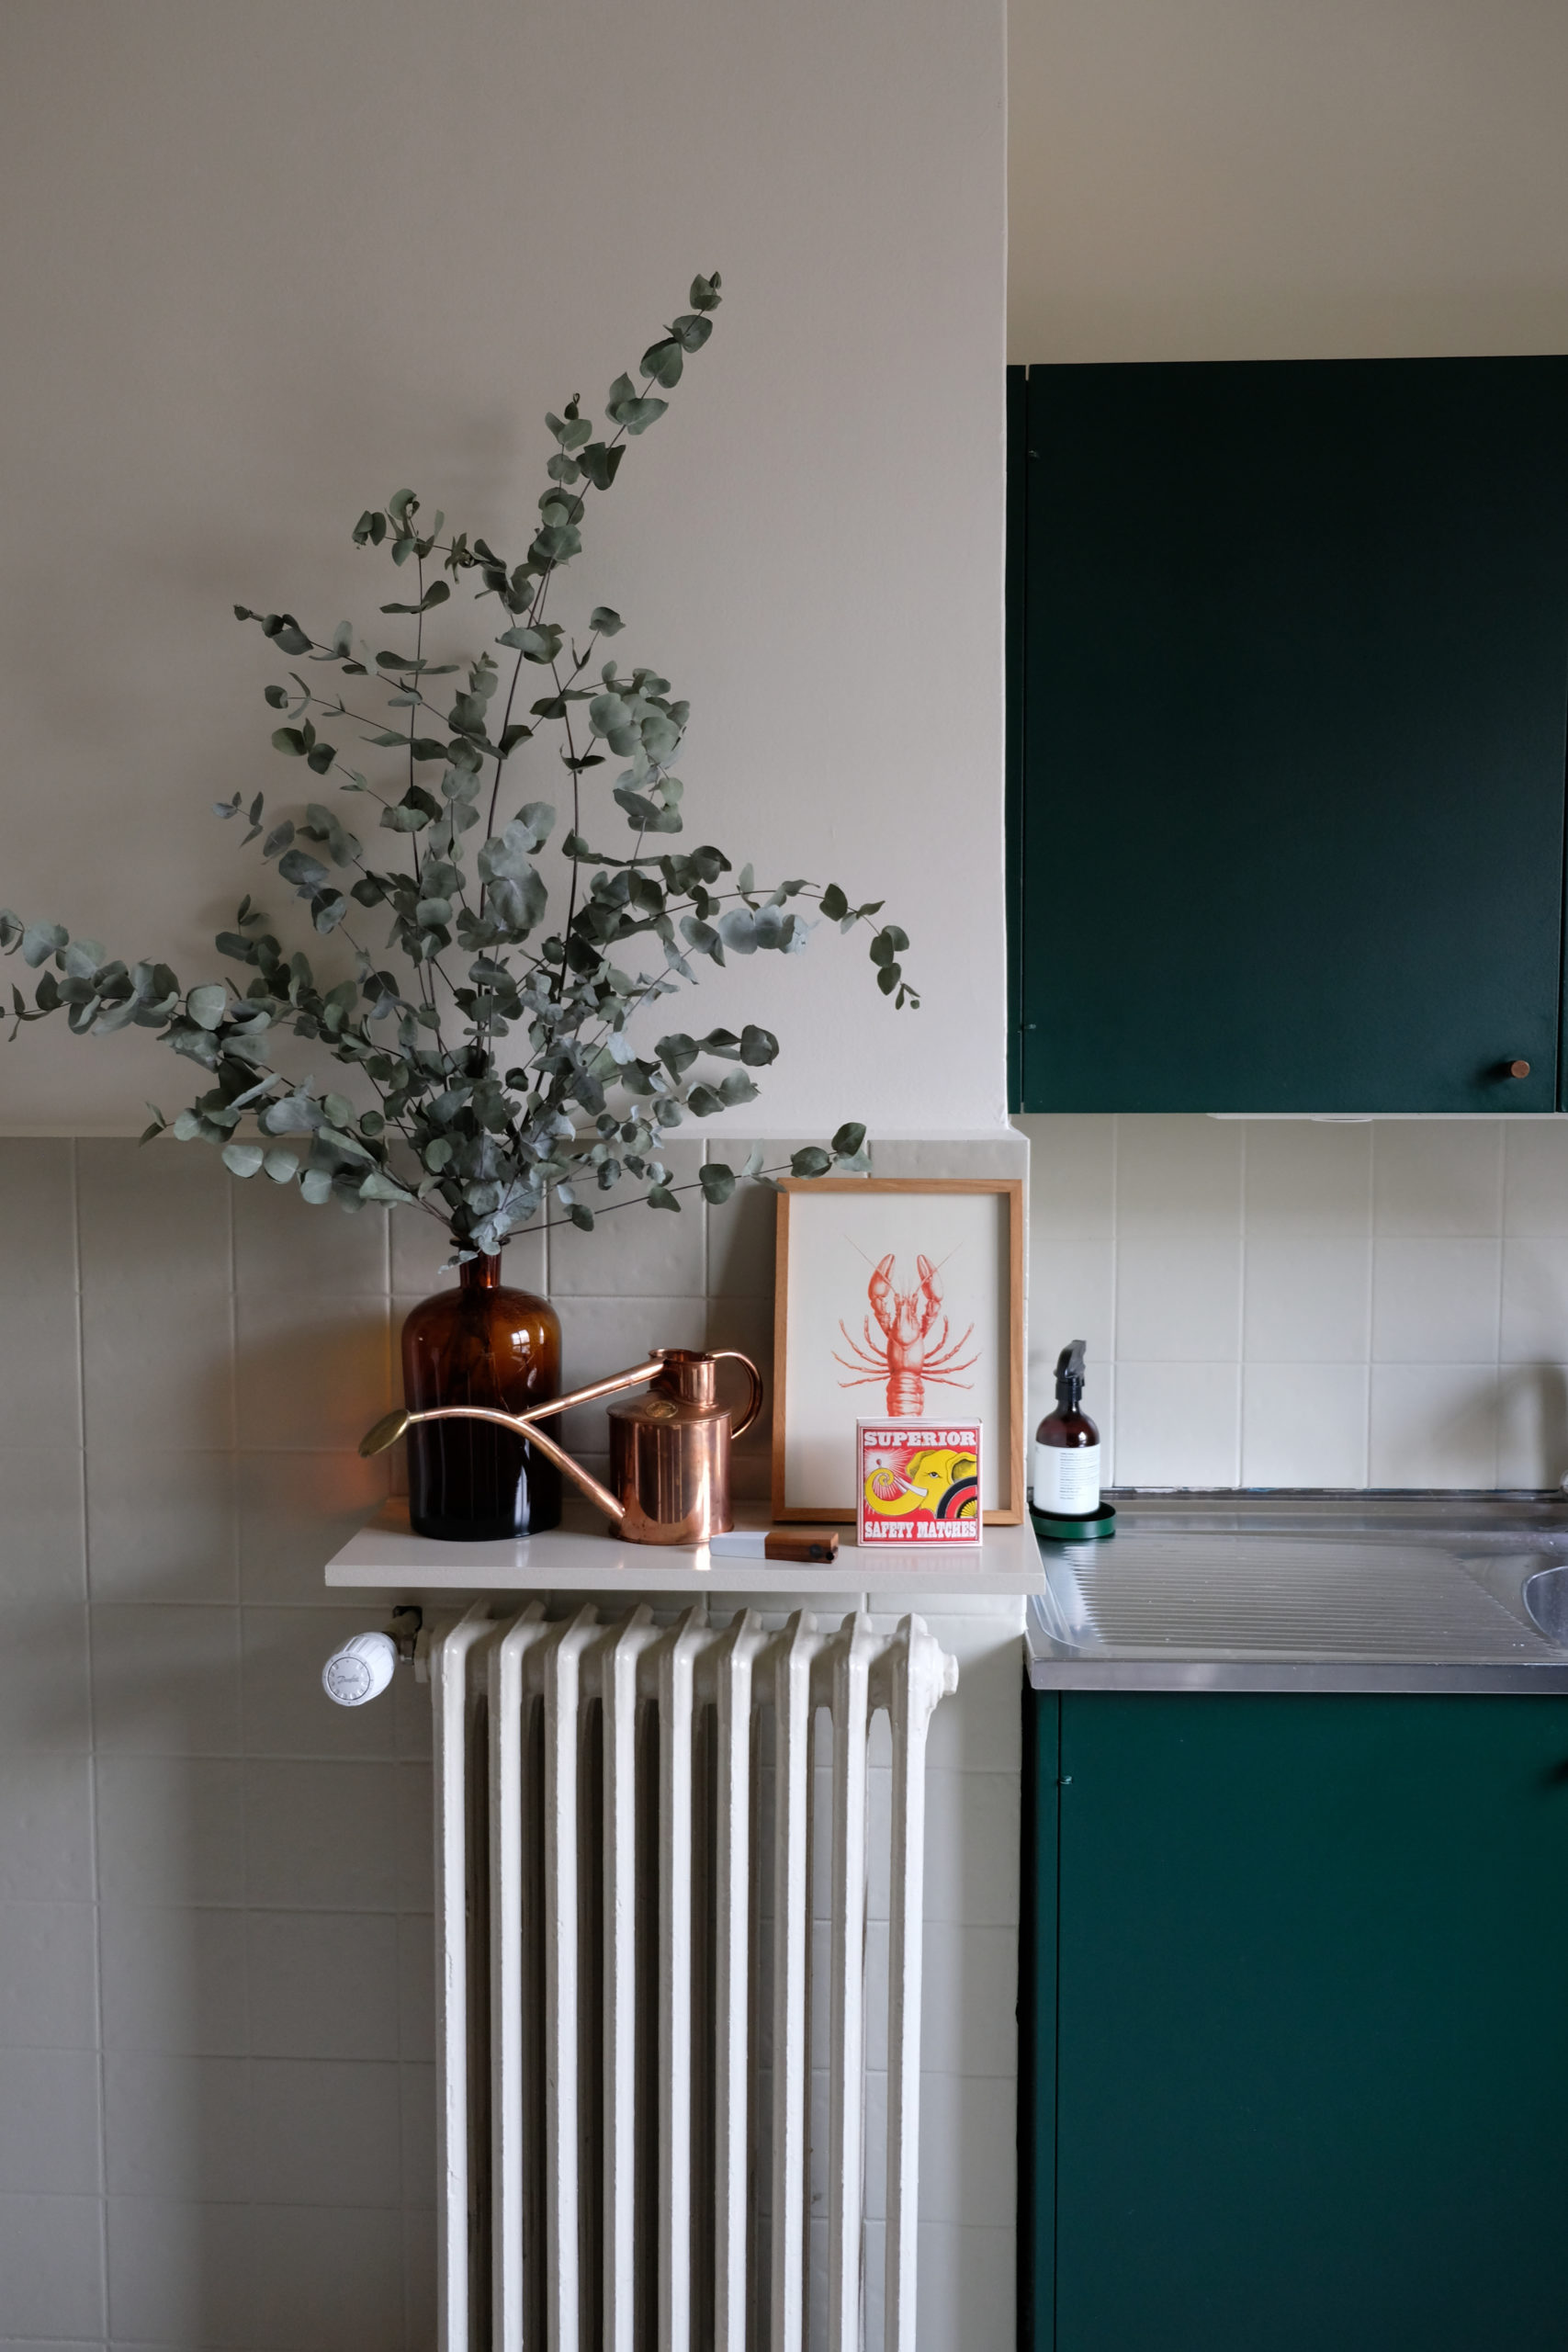
He started by painting the room entirely. As I told you earlier, I wanted to paint the wall tiles because I really didn’t like it. So he painted it in the “old white” shade from Farrow and Ball. The rest of the walls and the ceiling were painted in a kind of white that is not too white (weird thing to say).
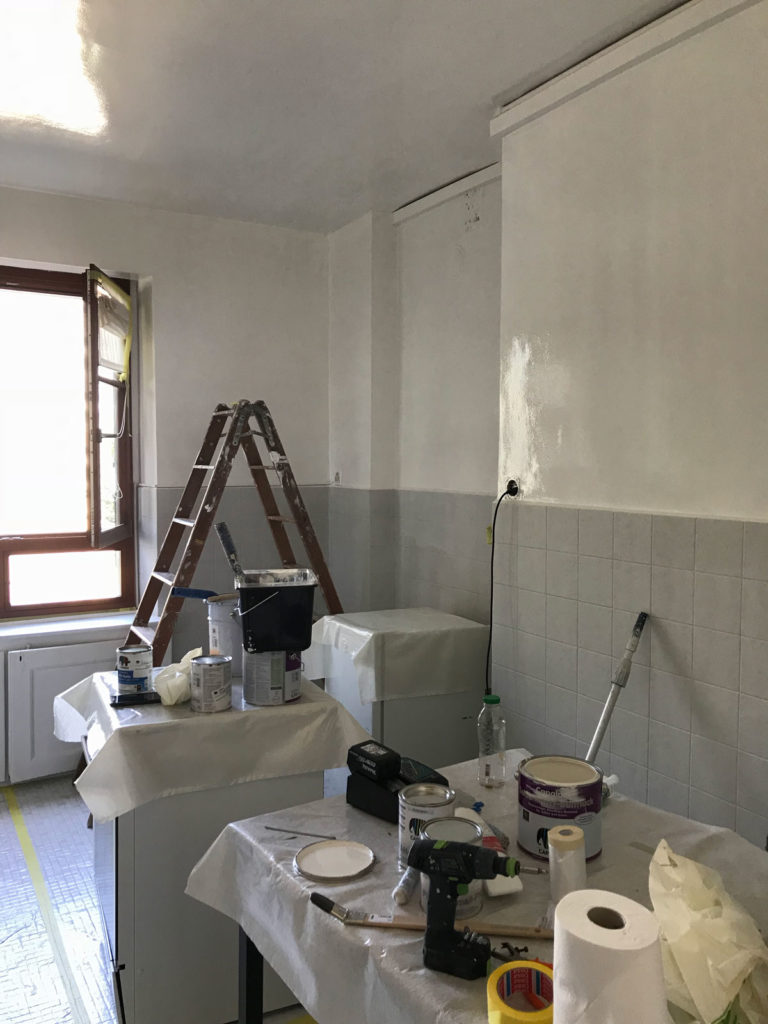
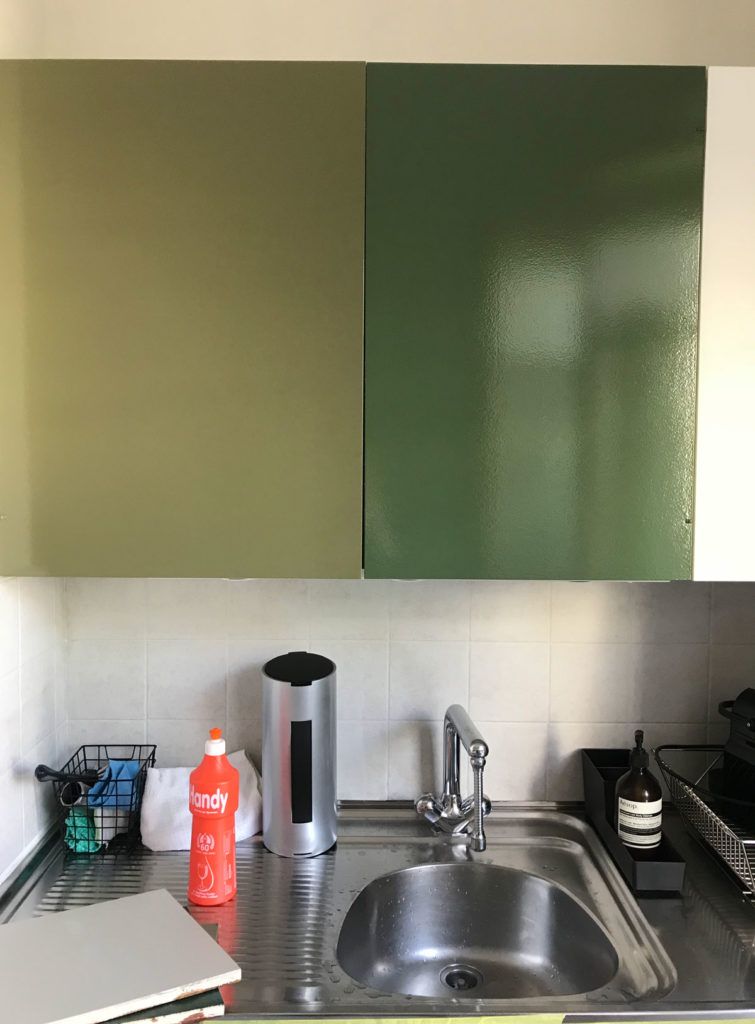
Then we made some sample for the colors of the Ikea cabinets, I had a certain shade of green in mind (a sort of forest green) but was afraid it was too bold. I was hesitating between 3 shades of green from Seigneurie so our contractor tested it in real for me to actually see it. I’m happy we did this because seeing it, in reality, was very different and convinced me that the bold option was the better one.
I chose to go with “vert Caucase” from Seigneurie for the cabinets.

Then the building part started. Because of our crooked wall, our contractor had to build a wooden structure behind the top cabinets to equalize it all. Ikea does not plan that kind of thing for you if you don’t take their building service. So be careful and try to anticipate as much as possible.
Then it was time to put the countertop. Our contractor cut it in situ so he was sure to have the right measurements since the back wall was not straight.
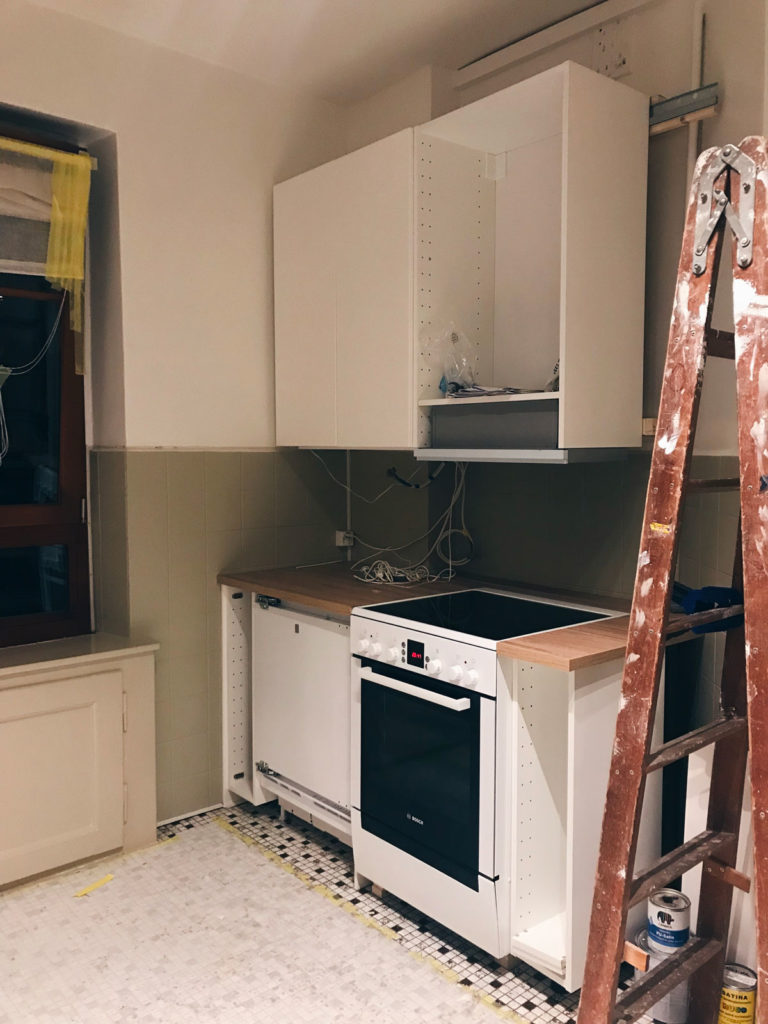
And finally painting the doors in this forest green plus fixing the handles.


Costs
We did an overall budget of what we were okay to spend on this kitchen remodel. The idea was not to go crazy and try to make smart choices. That’s why we kept our old stove, also why we went with a laminate countertop. Also, sparing money from the actual kitchen meant more money to buy a new dining table, lights, and decor items for the kitchen/dining room… We really tried to make the best choices in order to get a great kitchen for an affordable price.
So this is what it costs us roughly :
- 200 CHF for a guy to come and take the measurements of our kitchen
- 1100 CHF for all the Ikea cabinets, the lighting elements and more.
- 500 CHF for a built-in fridge (we had to replace our old one anyway)
- 300 CHF for the counter
In total = 2100 CHF* which is a fair price in my opinion.
This doesn’t include the contractor fee.
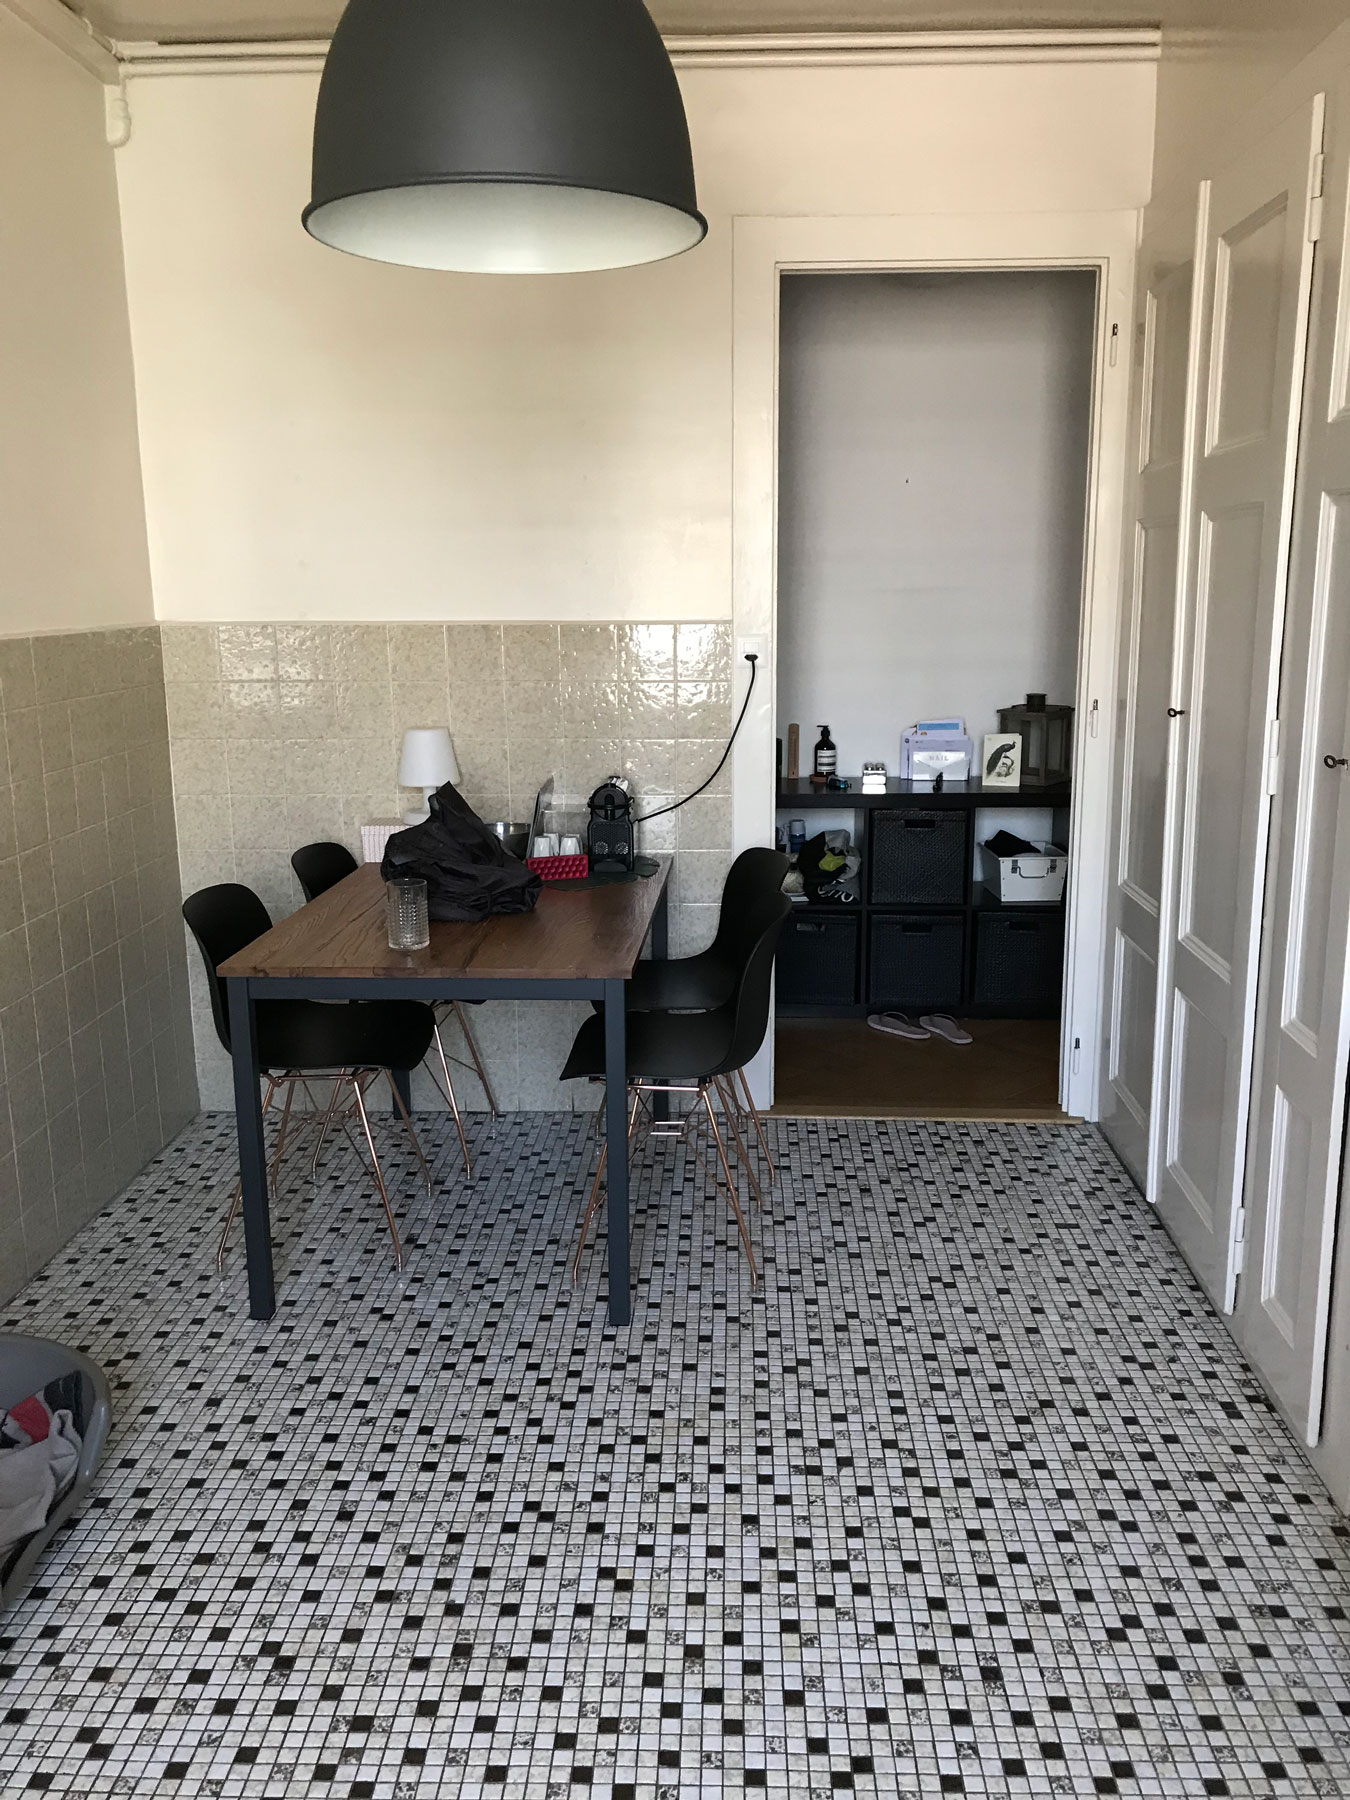
The kitchen reveal!


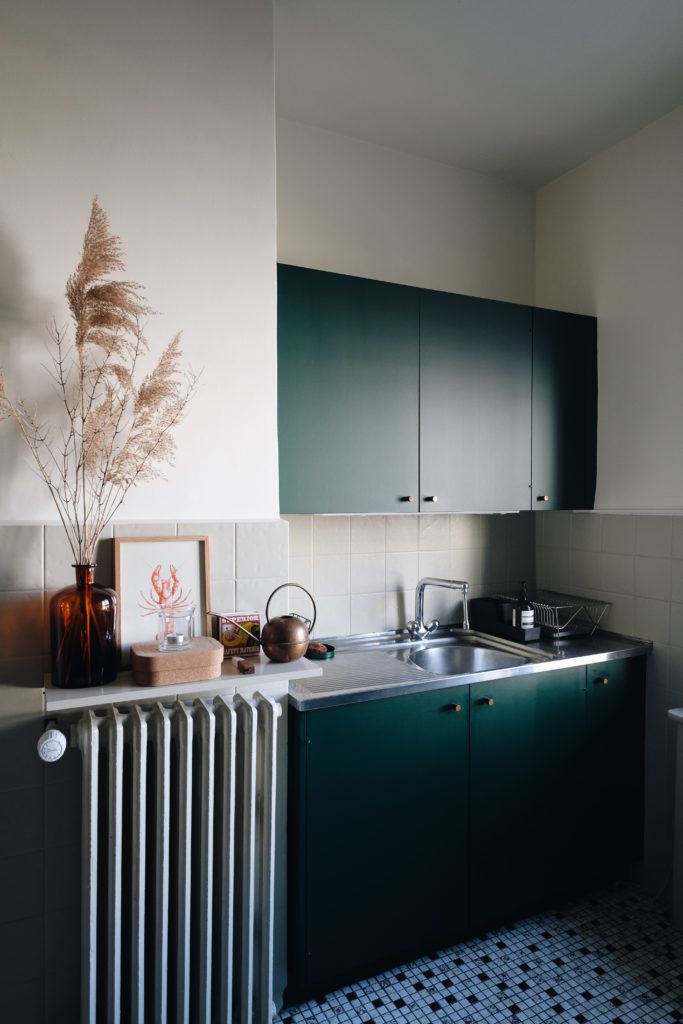

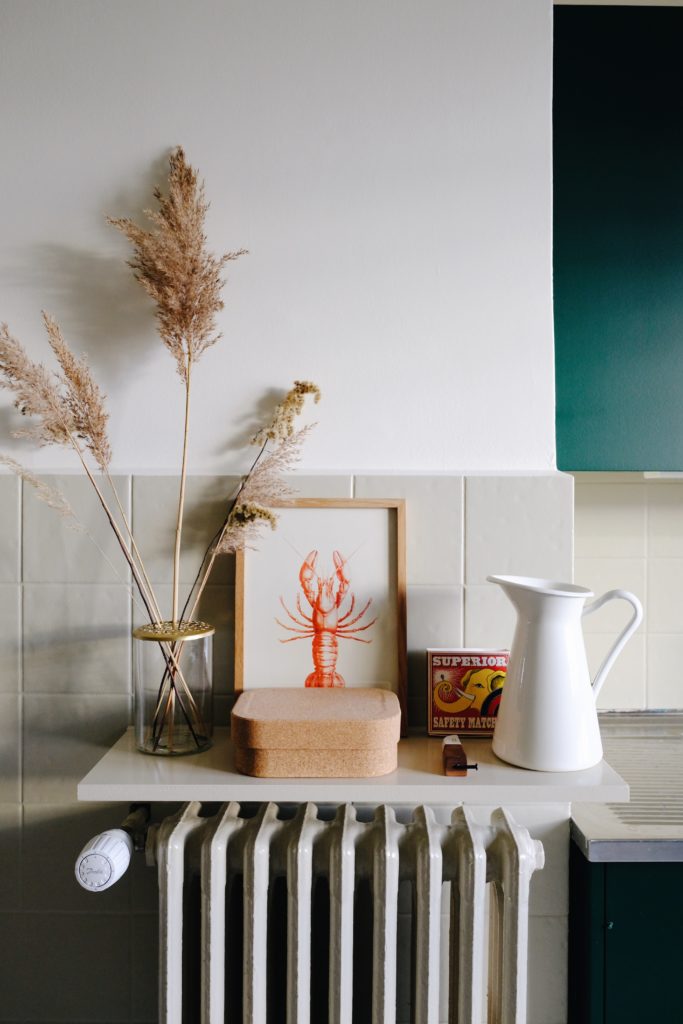


Before / after pictures


This looks fab. I love the kitchen table and shelves.. where are they from? Thanks
Hi Sarah,
Thank you for your kind words! Of course, the shelves are from String here is a link to the exact same model https://fave.co/30DHF4E and the table is from Micasa (swiss furniture shop) here is the link https://fave.co/3qPenuY. Hope this helps!
[…] This is one misconception that is really widespread. It’s not because you weren’t able to choose the flooring, the tiles in the bathroom or the wall colors that it’s a lost cause. Nowadays there are a lot of clever and cheap ways to pimp an ugly kitchen or cover bad flooring. Also, you could be surprised how a fresh coat of paint could change the face of a room. How only switching the kitchen cabinets doorknobs could take your kitchen from old-fashioned to modern and sleek. (Proof with my kitchen) […]
Hi, Can you tell me the name of the green you used? I looked through the post a few times and didn’t see it. Maybe I’m missing it?
Hi Sarah, no, you didn’t miss it. The green I used is called “Caucase green” and it’s by the french brand called Seigneurie. Thanks for pointing this out, I’ve updated the article. Have a great day
[…] you try to work with the existing or you try to hide it with temporary solutions. For example, I had a tile on my kitchen floor that I would have never chosen myself. But, after a little reflexion, I decided that I didn’t hate it and that it could even be a […]
[…] that if your room is not so luminous you should start by painting one wall and see how it goes. My kitchen renovation is proof of that. I’ve painted my kitchen cabinet in a very similar color but painting the […]
[…] using for something else. As it happens I have four radiators in my small flat. One of them is in my kitchen located at a very inadequate spot that kind of kills the traffic flow of the space. Therefore, I […]